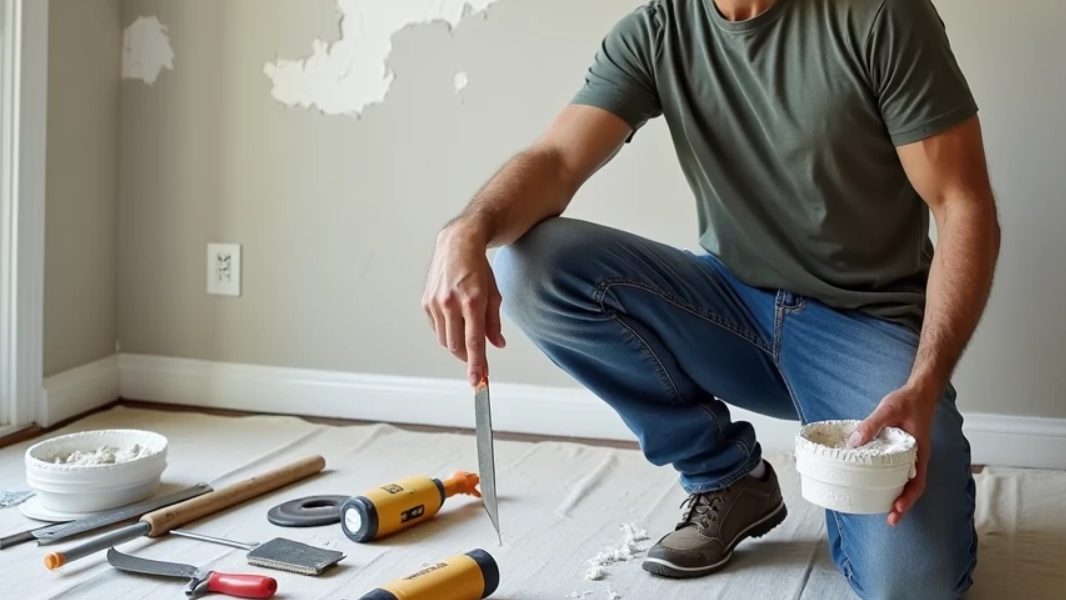
I’ve repaired more walls than I can count. Kids punching holes with toys, moving furniture that scrapes the drywall, hanging shelves that pull out anchors, and the endless dings from everyday life.
Early on, I used whatever random tools I had in the garage and the results looked terrible — bumpy patches, visible seams, and paint that didn’t match. Over time I built a small but effective collection of wall repair tools that actually make the job easy and the results look good.
These are the ones I’d buy again without hesitation, especially for beginners.
The essential starter toolkit
1. Putty Knives (6-inch and 12-inch)
This is the single most important tool. A good 6-inch flexible knife for small holes and a 12-inch for larger patches. I prefer the ones with comfortable handles and decent flex. Cheap plastic ones from the dollar store bend too much and leave ridges. I use the 6-inch almost daily.
2. Mud Pan
A sturdy plastic or metal pan to hold joint compound while working. Cheap ones crack easily. Get one with straight edges so you can clean your knives properly.
3. Drywall Joint Compound (Lightweight)
I always keep a tub of premixed lightweight compound (like USG Sheetrock Plus 3). It’s much easier to sand than traditional heavy mud and shrinks less. For small repairs, this is perfect.
4. Self-Adhesive Mesh Tape
Forget paper tape for most small repairs. Mesh tape is much more beginner-friendly — it sticks by itself and greatly reduces cracking. I keep a couple rolls in the garage.
5. Sanding Tools
A sanding sponge (medium and fine grit)
A sanding block with interchangeable sheets
Pole sander for ceiling or high walls (optional but nice)
The key is sanding between coats and using progressively finer grits. This is where most beginners fail and end up with visible patches.

6. Utility Knife and Replacement Blades
Sharp blades make clean cuts when opening holes or trimming damaged paper facing.
7. Small Level and Stud Finder
Critical when reinstalling anything after repair. Nothing worse than patching a hole only to realize your new shelf is crooked.
8. Shop Vacuum with HEPA Filter
Drywall dust is incredibly fine and gets everywhere. A good vacuum with attachment makes cleanup fast and protects your lungs.
My step-by-step process using these tools
For a typical nail hole or small dent:
Clean the area and lightly sand
Apply mesh tape if needed
First thin coat of compound with 6-inch knife
Let dry, then sand lightly
Second coat with wider knife, feathering the edges
Final light sanding and touch-up paint
For larger holes (fist-sized or bigger), I cut a clean square, insert a drywall patch or backer, then tape and mud.
Tools I deliberately skip or cheap out on
Fancy corner trowels (overkill for most homeowners)
Expensive electric sanders for small jobs (messy and unnecessary)
Spray texture cans (rarely match existing texture well)
Real repairs from our house
In our current house, my son’s room had multiple holes from various “experiments.” Using just the tools above, I repaired them over a weekend. After painting, you literally cannot tell where the damage was.
The garage wall took the worst beating during tool organization. Bigger patches, multiple coats, careful sanding — the result looks factory-finished.
Why these specific tools work for beginners
They’re forgiving. The lightweight compound is easy to work with. The mesh tape reduces cracking. Good knives help you feather edges properly so patches disappear.
Most importantly, having the right tools makes the job less frustrating, so you’re more likely to do it right instead of rushing or giving up halfway.

Building your wall repair confidence
Start small. Fix a few nail holes and light switch patches first. Once you get comfortable, move to bigger damage. Each successful repair builds skill fast.
I keep all these tools in a dedicated plastic bin in the garage labeled “Wall Repair Kit.” Total investment was around $85 and it has easily saved me $800+ in avoided handyman calls.
Wendy’s perspective
She used to dread when I said I was fixing a wall because the results used to be obvious. Now she trusts me with bigger patches because the finished work blends in seamlessly.
Final recommendation
If you only buy a few things, get:
A good 6-inch putty knife
Lightweight joint compound
Mesh tape
Sanding sponge
That combination alone will handle 80% of household wall repairs.
You don’t need to be a professional to make walls look good again. You just need the right beginner-friendly tools and a simple process.
I’ve already made the ugly patch mistakes for you. These tools and methods will give you clean, invisible repairs every time.
The money saved by not calling someone for every little hole is enough to buy a case of beer.
Don’t worry, it’s not expensive to fix your own walls.


No letters yet — pray write the first.